Creating an In-App Keyboard for your Android Apps
Previously, I shown you how to create a System Keyboard for Android with Android Studio. Today, you are going to create an In-App Keyboard for Android Apps. An In-App Keyboard is a custom Keyboard which will be used exclusively within your Android Application.

Note that you can also watch this tutorial on YouTube :
Creating the layout file for the Keyboard
First, we need to create the layout file for the Keyboard. Our Keyboard is a custom compound view which will be inflated from the below XML layout file. This is an example of layout. You can use whatever layout you want to arrange the keys like you want. So, you can be creative with your In-App Keyboard.
This is our layout file for the Keyboard :
Like you can see, our Keyboard will have numbers from 0 to 9 but also a delete and an enter buttons.
Creating the layout of the Main Activity
To try our In-App Keyboard, we create a Main Activity with a dedicated layout. Our layout will have an EditText and our In-App Keyboard implementation at the bottom. Note that our implementation is called MyKeyboard.
We are going to put all the code associated to the Keyboard in a dedicated class to make easier the reusability of the Keyboard in another activity.
The layout will have the following form :
Writing the Java code for the Keyboard
Next step is to write the Java code of our In-App Keyboard. Called MyKeyboard, our implementation extends the LinearLayout view and implements the OnClickListener interface to react to the users’ clicks.
In the init method, we inflate the layout for our Keyboard. We get the references for the buttons of our Keyboard. Then, we set the View as the OnClickListener instance for all of these buttons. Finally, we associate each button to an input String with the keyValues SparseArray. When a user will click on a button, we will use this SparseArray to return the associated String.
In the onClick method, we use an InputConnection. It mimics the way a system Keyboard communicates with an EditText. Like that, we can avoid the hard links and we make easier the reusability of our In-App Keyboard.
If the user has clicked on the delete button, we delete the previous character or the selection. Otherwise, we get the associated String to the clicked button and we commit the text by calling the commitText method on the InputConnection instance got previously.
Note that the InputConnection is set on the Keyboard through its setInputConnection method. It gives us the following code for the MyKeyboardclass :
Writing the Java code of the Main Activity
Last step is to write the Java code of the MainActivity for using our custom Keyboard. For System Keyboards, the Android SDK uses an InputMethodManager instance to point the keyboard to the focused EditText. In our example, the MainActivity will take its place by providing the link from the EditText to our custom Keyboard.
Like we choose to use our In-App Keyboard, we need to disable the System Keyboard to avoid that it pops up when the user will touch the EditText. Then, we get the InputConnection instance from the EditText and we set it on our MyKeyboard instance.
It gives us the following code for the Main Activity :
It you want to create an Activity with multiple EditText inside, you will need to write code to pass the right EditText’s InputConnection to the In-App Keyboard.
A good way to achieve that would be to add an OnFocusChangeListener and an OnClickListener to each EditText of your Activity. You should also hide or show your custom Keyboard at appropriate times.
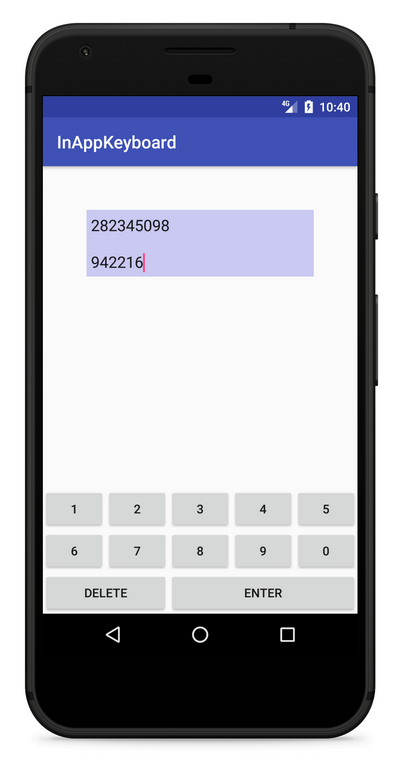
Our In-App Keyboard in Action !
Best part of the tutorial is coming. We are going to put our In-App Keyboard in Action. So, we launch our Android Application on a device. You should have the following result :
That’s all for that tutorial !
To discover more tutorials on Android development, you can subscribe to the SSaurel’s Channel :


Leave a Reply
You must be logged in to post a comment.